Feeds:
Posts
Comments

Archive for the ‘Kid crafts’ Category

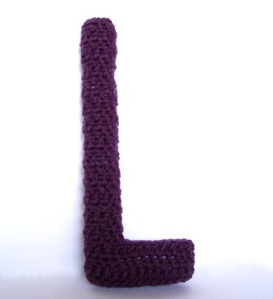
Capital L crocheted

Letter of the Week

Last week was a very busy one for me, both in preschool and in “real” life.  At home I had three different people have a stomach virus at different times (including me) and my oldest broken her arm roller skating.  Because of the craziness at home I did not get to post my favorite activities of the week in preschool.  So now I have a little time to breathe and am ready to share, including my first preschool printable.

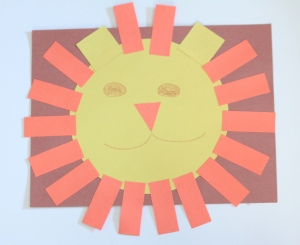
Lion shapes craft for preschool

Lion craft using BW version and printing on construction paper

During chapel last week the story was Daniel in the Lion’s Den, so I wanted to make some type of lion craft to go with it.  Since I only have my students three mornings a week I try to combine skills whenever possible, so I combined the Bible story with the shapes theme for this craft.  I made two printables for this activity.  One is made in color so you can just print it out and then cut.  The other is in black and white so that you can print it on color paper.  I printed mine on construction paper.  The black and white version has several triangles to choose from for the nose; I am still perfecting my triangle drawing capabilities in GIMP and was not quite satisfied with several of them.  My students liked being able to choose a triangle for themselves.

Color Lion Printable  part one   part two

Black and White Lion Printable  part one   part two

During centers time we used some roads in shape form from Making Learning Fun.  I printed out the four main shapes we were learning and laminated them.

Source: makinglearningfun.com via Laura on Pinterest

Through Pinterest I also discovered a printable story retelling set for Mouse Shapes, which I somehow ended up with two copies of from the local library after searching fruitlessly through two book stores. We also sang several shapes songs, including ones that were posted on my walls.


For our letter of the week, I brought in the crocheted letters that I made, taught them the ASL sign for the letters, and wrote the letter on our white boards. We have a few worksheets that our school gives us to use and then I discovered a few things to use on my own. I read aloud (with a refrain for the students) a poem, “Little Lovely Lambs” which I found through Scholastic. We also used a couple of activities from Raising Rock Stars Preschool, including the minibook and words that begin with L sheet.


I know there is plenty more that I jammed into the week, including sponge painting with our four main shapes, a sensory bin of pasta and the shape blocks I found on clearance at the Target Dollar Spot, and our alphabet exercise cards. For more ideas for shapes, please check out my Colors and Shapes board on Pinterest. Many alphabet ideas can be found on my Alphabet Pinterest board as well.


If you download my lion craft, please let me know.  I would also love to see your creations with it.  Also, if you are interested in the crocheted letters, let me know or check out my crochet patterns page for more information.  I sell both the patterns and the finished product.
Read Full Post »

Brown Bear, Brown Bear What Do You See?

We started our week with Brown Bear, Brown Bear, What Do You See? by Bill Martin and illustrated by Eric Carle.  I shared two versions of the story, the one pictured and an older version with a mother instead of a teacher and different illustrations.  I found clipart from Kidsparkz to make into magnet to put up on the easel while telling the story.  I had made this set before realizing my easel at school was NOT magnetic, so I had to bring in my kids’ easel to use for this week.  I also had a matching puzzle set available during centers time to match heads and tails as well as to put the story in order.  Another Brown Bear center was a roll and color sheet from Making Learning Fun.

Centers time also included a fishing for colored fish game.  I made the fish with my Cricut and laminated them before attaching a paper clip to each.  Students had to name the color as they caught the fish.  We also used the colored pasta bin from last week and sorted pasta by color.

Freight Train

Another book we read this week was Freight Train by Donald Crews.  I printed out color cards and hid them around the room, giving my students the instructions to find six cards.  Once they found six, they had to put each card on the construction paper train car that was the same color.  I noticed that a few kids had problems with a couple cards, so made a note of that to make sure I review colors especially with those students in the coming weeks.

Mouse Paint

Our main book for Friday was Mouse Paint by Ellen Stoll Walsh.  I also found a set of printables from Kizclub to make into magnets for retelling this story.  After reading the story and using the magnets, we used a printable from Confessions of a Homeschooler to work on mixing paint colors.  We first painted the red mouse with a paintbrush that had a red handle.  Once finished, I took the red handled brushes and handed out yellow ones and yellow paint to paint the yellow mouse.  Then I took those and handed out orange brushes but no paint, asking the students how we could get orange paint.  We then mixed the yellow and red to make orange.  We continued in this pattern without too many mice getting painted the wrong color or too many colors mixed together that should not have been.  Once finished with the mice I gave them each a sheet of blank paper to paint as they pleased and to mix the rest of their paint to experiment.

During the whole week we worked on making a Colors book.  The book was the size of half a sheet of construction paper, with a different color for each page.  Students glued on the appropriate color word (printed in the color it said) as well as an object that color.  For example, the red item was an apple, blue was a butterfly, and so forth.  This involved matching colors, practice in using glue sticks, cutting skills (cutting out the items), and allowed me to see if the students recognized whether they were gluing their words on right side up or upside down.

There were several other interesting color ideas that I just did not have time to do that you can check out on my Colors and Shapes Pinterest board.  If you check that out, you will also get a peek at some of the ideas I have in mind for next week’s Shapes theme.  We will also be working with the Letter L and Number 1.

Read Full Post »

A peak at my students' Chicka Chicka Boom Boom Tree craft

The first week of preschool has come and gone.  I am quite pleased with how it went, although I feel bad that one of my students was sick all week and unable to come.  Hopefully I will have all of my students this week.  I thought I would share the favorite activities that I discovered online (and especially through Pinterest.)

I decided to use the Making Smart Choices at School book that I found through Pinterest on the first day of school.  We did the pocket chart cards by just taping them on my easel since I don’t have a pocket chart other than my calendar right now.  Later in the day the kids glued the smaller version onto a sheet to take home, which made for a good way to talk about how to use glue sticks.

For centers this week I dyed pasta (some that I had gotten a great deal on with coupons but did not care for when cooked.)  You can find some information about pasta coloring here.  I hid the letters from an alphabet puzzle in the bin with the pasta for the students to find and finish the puzzle.  This gave me a good idea of how familiar my students are with puzzles and the alphabet as I observed their strategies for completing the activity.  A second center involved cut up pool noodles that were strung onto clothesline.  On the final day of this center we even tried doing AB patterns and most kids were very successful with the pattern, which was awesome.  Another center involved cutting strips of paper between the stickers.  It was interesting to see which kids would want to just cut and cut and cut in this center.  It also helped me see which kids would need some more instruction on holding scissors, especially when I challenged them on the last day of the week with a bigger sheet of paper instead of strips.

One of our books for this past week was Chicka Chicka Boom Boom.  We read the big book twice, made a special snack with graham crackers, apple slices, and Scrabble Cheez its,  and did a craft similar to this one.  For our snack, I gave the kids two apple slices, one long piece of graham cracker (4 crackers), and a handful of Cheez its.  We did not use anything for coconuts for our snack.

I will attempt to get some photos of my classroom and the centers to add to this post tomorrow.  Somehow even though I brought the camera two of three days I only remembered to grab a shot of my bulletin board and my students to add to the bulletin board.

This week our theme is Colors.  What are your preschoolers doing this week?

Read Full Post »

State Study, Chore Chart, Baking and Crafts….

I cannot quite believe everything we did this first week of summer.

State Study

We started our study of the 50 states with our state passports that we found on Musings of Me’s blog.  We decided to use card stock as a cover and back to the passport.  The pages had to be stapled in sections since it was so thick so our passports have a bit of an accordian look to them right now.  (I will attempt to get my daughter’s camera to speak with my computer this evening for some added photos.)  We started our study with Virginia on Monday, since that is the state where we live.  We moved on to West Virginia on Tuesday and Kentucky on Wednesday.  After that, the week got a bit nutty and we took off for a couple days and did Tennessee today.

If you check out my United States theme board on Pinterest you can see some of the places and books that I am using for this project.  I am trying to give my kids information in different ways each time so that they don’t just get the same worksheet to fill out every day about a different state.

Chore Chart

We also started our summer chore chart, thanks to Confessions of a Homeschooler and a pocket chart calendar that I picked up on clearance a while back when I was not sure whether I would receive one with my preschool classroom. The girls have really gotten into earning tickets, although they don’t necessarily put the chore cards on the spots I planned. Mostly they look at the chore cards for ideas of what to do. My youngest really wanted some of those tiny toys in the little balls, so I told her 10 tickets earns one. She has been pretty good this week about earning 10 tickets in a day so she can earn a toy. On the other hand, my oldest has been saving hers and cashed in to get $1 for spending at the craft store on a pretty blank notebook. She is still holding some tickets to cash in to attend the $1 movies next week.

Other places I found with printable chore cards include:

Aussie Pumpkin Patch — new design here, less detailed ones I printed some of the less detailed ones after reducing them in size so they would fit in the pockets of my chart.

Homeschool Creations — a simpler chore chart with cards

Baking

Banana Bread Recipe from this book

We made two loaves of bread machine bread this week.  The first loaf was a requested banana bread for my youngest, who helped measure everything and was a little disappointed to find out that the machine mixes everything for us.  We chose a recipe for Banana Poppyseed bread, but left out the poppy seeds.

The second loaf yesterday was almost a disaster.  We decided to make whole wheat raisin bread from the recipe book that came with our machine, partly because we were out of bread flour and only had whole wheat to use.  When it came time to add the raisins I hit the start/stop button for some reason after my youngest put the raisins in, which turned off the machine.  I then saved the loaf by kneading it a bit, letting it rise, and then finishing it in the oven.  It probably could have had some more time rising before I put it in the oven, but the girls were more than happy with the results.

Crafts

We travelled to two craft stores this week for free craft activities.  I managed to get out of them with only one purchase.

ACMoore has a weekly free craft on Wednesdays all summer from three to five in the afternoon. For this week it was supposed to be CARS related stickers, but the craft person was kind enough to get out some leftovers from other times so the girls could decorate a framed chalk board with glittery stickers.

Michaels has an around the world themed (mostly) free craft on Tuesdays, Thursdays, and Saturdays this summer.  We attended the Germany and Egypt themed crafts at Michaels.  The girls decorated a jingle bell with paint markers and put a bow on top for Germany.  My oldest also made a German hat with feather.  For Egypt they made mummies from a clothespin and strips of white tissue paper, along with googly eyes.  They used some terra cotta Model Magic to do some heiroglyphics and a pyramid.

We also created some crafts at home.  I discovered this yarn doll tutorial via Pinterest and shared it with my girls.  We now have probably 20 or more yarn dolls of various sizes and colors that are being used in elaborate pretend play games.

Gardening

I almost forgot that we planted some sunflower and tomato seeds that I received as a thank you from the kindergarten teacher and assistant for volunteering every Thursday morning this year.  We now have seedlings that are almost ready to move into larger homes.  Now, where to put them?


Read Full Post »

old books
Over the last few days I have been reviewing which summer reading programs will be available this summer that the girls participated in last summer. It looks like they will have plenty of forms to fill out with all of the books they manage to read. Here are the ones we plan to participate in this year:

1. Our local library’s Summer Quest reading program. For this program we will go to the library each week with our reading log form. There will be a coupon of the week as well as additional coupons/rewards for reading five, fifteen, and twenty five books. We also turn this form into the school in the fall for summer reading credit.

2. TDBank has a summer reading program as well. For reading ten books each child receives $10 placed into their savings account. This is a great way to start adding up some money for college. We did this last summer. I admit it was not the most exciting one for the kids since the money went straight into their savings accounts.

3. Barnes and Noble has a summer reading program that involves reading eight books and writing down not only the book and author, but a recommendation of who should read it. This program appears to be for first through sixth graders, but the specific instructions do not appear to have an age designation, just the book choices offered. I cannot remember if we completed this one last year; we may have skipped it since it appeared that my youngest could not participate due to age even though she could read. I need to find out if we will be limited to the book choices in my kids’ actual grade level. If this is the case, I think we will end up donating the books and letting the kids pick something out for themselves at the used book store as a reward.

4. Borders also has a Double Dog Dare reading program. For this program your child must be 12 and under and reading ten books to receive a coupon for a free book. Last year I believe they had a particular display where you chose your free book. This worked well for us since my girls are reading above grade level and would not have wanted the books for the grade level they attend in school.

I am also thinking ahead to summer and planning our schedule with a State of the Day theme for much of the summer in addition to attending library activities, Regal’s Summer Movies (which are a dollar this year instead of being free), and summer crafts at ACMoore. My oldest will also be going to sewing camp with Grandma while I plan something special for the youngest who will have me all to herself that week.

What inexpensive, fun and educational activities are you planning for your family this summer?

Read Full Post »

Handcrafted gift for teachers

A few completed cards

Somehow the end of the school year got away from me. I think the fact that I have two kids with two different schools and two different last days made this year a challenge. Now that the preschool end of year party has passed (and a custom order got mailed away) I have spent part of the day making some sets of note cards for my second grader’s favorite teachers.

step one of making teacher notecards

Cut white cardstock in half

I started out with white cardstock that I cut in half.

Folding notecards in half

Fold notecards in half

Then I folded the pages in half. You could use a bone folder for this step. I ended up not using it this time since this cardstock was not likely to crack or break at the fold.

Using patterned scrapbook paper on card face

Cut and glue scrapbook paper on card front

I then pulled out a couple sets of school themed paper stacks I had in the house, School Scrap Pad Kit by stemma and Back 2 School collection by Autumn Leaves. I bought each of these on clearance different years at Target (still have the clearance stickers on them.) I chose some patterned papers and cut 4 inch by 5.25 inch pieces, being careful to cut so the patterns would go in the direction I wanted the cards to open.

Adding finishing touches

Add a one inch strip to the card

I then started adding finishing touches to the cards. For the one above, I added a one inch tall by 5.5 inch wide piece of dark red cardstock. I then added a cut out from Learning Curve using my Cricut. I cut a 1.25 inch apple tile with the same red and used some scrap pieces of scrapbook paper to put behind the apple. I added similar finishing touches to some of the other cards and left some simple.

Adding the Cricut cut out from Learning Curve

Completed card with Apple Tile from Learning Curve

Each teacher will get a variety of notecards tied together with ribbon and a little tag with a thank you from my daughter. I really wish I had started these sooner, as it was a simple enough project that my daughter definitely could have helped with more than the tags.

Read Full Post »

buttons for hair accessories and crocheted items

Some of my cover buttons

Quite a while back I purchased some supplies to make cover buttons to use in making hair accessories. I made a bunch, sold just a few, gave a bunch to my kids, then donated some for Bingo prizes at my older daughter’s school. I then promptly forgot that I even had the supplies around.

Recently I have been looking for some good buttons for my apple cozies and have not had much luck figuring out exactly what search terms to use to find what I want. I suddenly remembered my cover button supplies and decided to see how I liked using those with the apple cozies. While I was at it, I also made a few new sets of ponytail holders for my daughters. (They claimed them before I could take a photograph.)

I think I may teach my eight year old how to make the cover buttons this summer as one of our craft day activities. I think she would enjoy making them, especially since they do not take too long and can be used for ponytail holders and barrettes.

If the sun peeks out later, I will try to get a good photo of my first apple cozy with the new cover button attached. Otherwise, I may put up my husband’s studio lights tonight and play around with them.

Read Full Post »


Although we decided to wait a bit with our decorating of the yogurt cups, the girls have been anxious to check and water them each day as well as moving them to a good sunny spot. The oldest over watered hers a bit at first, so they got to spend time on the front stoop during the day to dry out a bit. Mine were combined with my five year old’s in the front window each day. She now has two Alyssum and a Morning Glory cup with sprouts while I have two Sweet Williams. The oldest has one Morning Glory popping up now that hers are a bit drier.

If I can, I want to convince the girls to give up a few of their seedlings for teacher gifts for Easter. Hopefully we can decorate the cups a bit and then give some away. Since we have plenty more seeds, I have my fingers crossed that they will want to share.

Read Full Post »

I had been saving some yogurt cups in hopes of using them to start some flower seeds this month. Since I had quite a few of them I thought I might decorate them somehow to be able to give some of the started seeds as gifts to teachers for Easter. I had a few ideas in my head, but I figured why not check out what other people have come up with before me. While searching I found some other cute ideas to use yogurt cups if we end up having any left over today.

reusing yogurt cup crafts

Frog


Turtle and Frog Spring Crafts
This one might take a while to complete as you need to paint the cup first, let it dry, then attach the other items.

Reusing yogurt cups to  make felt animals

Felt Dog and Cat Yogurt Cup


Felt Dog and Cat
There are some great directions here if you think these are cute. I don’t think I have any felt on hand, so we probably won’t try this one today. Maybe after the next trip to the craft store.

reusing yogurt cups to make favor baskets

Yogurt cup beaded baskets


Beaded baskets
This seems more along the lines of what we may do today, although I am not sure about the handle part if we are going to plant a seed in it. It does look like the handle could easily be bent down, however, when it gets to be time to replant the young flowers.

I will take some photos today of what we come up with and share later. Hope these ideas keep you busy on a rainy Saturday. I hear the brownies are ready to come out of the oven, so off I go….

Read Full Post »